Transportation

At Brighton Tru-Edge, we recognize that the job isn’t done until it’s arrived safely at your job site or manufacturing facility. We utilize our experience in shipping to safely transport your completed heads and other fabricated items.

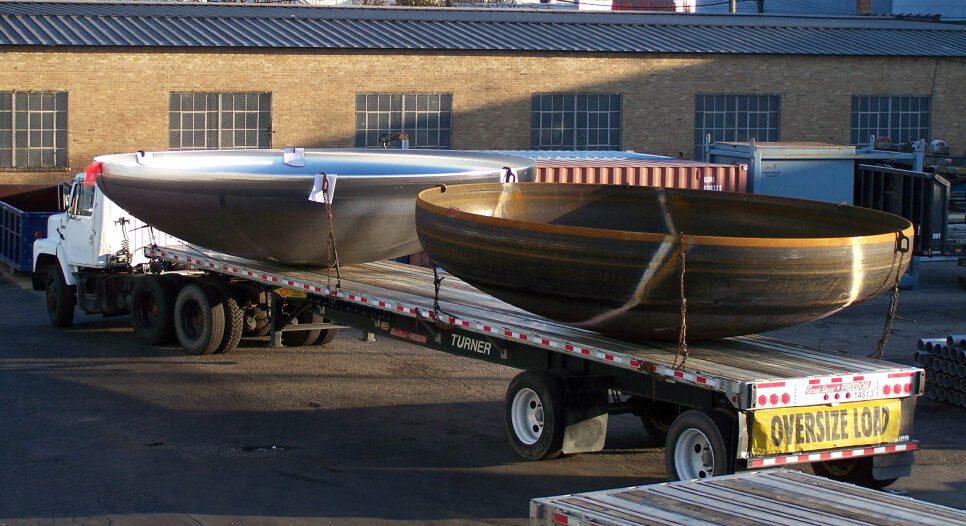
In addition to closed truck shipping, we utilize specially designed racks that make it possible for us to transport heads up to 15′ in diameter without oversized load requirements. We also have experience with transporting larger heads, when necessary.
Tank Head Circumference

Our team is prepared to answer any of your questions about the specifications for your tank head. For a quick calculation, use the tool here. Or you can download a complete Tank Head Circumference Chart, which provides the information in feet, inches and fractions of inches.

Circumference Chart

IDD & Volume Charts

Our team is prepared to answer any of your questions about the specifications of your tank head. You can download one of our Inside Depth of Dish (IDD) volume charts, which provide information in for IDD based on thickness variable, Outside Diameter (OD) and Inside Knuckle Radius (IKR). We also offer special IDD information upon request.

Standard Flanged & Dished

ASME Flanged & Dished

Head Volumes

Glossary

In ferrous materials, heating to a temperature above the critical temperature, holding for a specified time and cooling at a suitable rate in order to soften and produce desired changes in other properties as well as the microstructure. In nonferrous metals, annealing is used primarily to remove part or all the effects of cold working.
The space between the inner and outer head in a jacketed head.
The governing body of pressure vessels in the United States. Brighton is a registered ASME Code Shop. Copied of our Certificate can be supplied.
A machined or flame cut angle to aid in the fit-up and welding of seams. Brighton offers a full array of machined bevels to chose from. Please refer to our bevel chart for details.
The starting flat diameter before forming.
A test for determining the hardness of a material by forcing a hard steel or carbide ball of specified diameter into it under a specified load. The result is expressed as the Brinell Hardness number, which is the value obtained by dividing the applied load in kilograms by the surface area of the resulting impression in square millimeters.
An empirical value in weight percent relating the combined effects of different alloying elements used in the making of carbon steels to an equivalent amount of carbon.
A hole that is drilled in the center of the head prior to flanging to ensure that the true circle dimension is held during forming. Brighton can make heads without a center hole.
Used to determine notch toughness. Specimen is notched perpendicular to the plate surface. The direction (longitudinal or transverse) of the specimen axis is selected according to the appropriate specifications for plate steel. The specimen is held for 10 minutes at test temperature and then broken in the appropriate impact machine by a single blow of a freely swinging pendulum.
A mechanical operation in which a metal shape is permanently deformed into a new shape, normally at room temperature.
Heads can be formed to an inside or outside diameter. Brighton can custom make heads from 6” to an unlimited diameter. Please see our product specification for more details.
A type of heat transfer surface utilizing sheet that has a dimpled pattern. Brighton can provide dimple jacket for shells and heads.
A machine that forms the dish radius in the heads. Brighton has presses that can press material up to 3” thick.
Also known as crown radius. It is the major radius of the formed head, usually measured from the inside.

Fiber elongation of formed heads often requires stress relieving after cold forming of the heads. The stress relieving time and temperatures are outlined in UCS 56 of the ASME Section VIII Div 1 Code. The formula for calculating the fiber elongation is located in ASME Section VIII Div 1 UCS-79.

For heads the calculation is: 75t/Rf ( 1-(Rf/Ro))

t = nom. thickness
Rf = Inside Corner Radius (ICR)
Ro = Dish Radius (infinity for flat flanged only)

The metal that us used in filling the seam when welding. Brighton can supply weld procedures for customer review before fabrication begins.
A machine that forms the knuckle radius and straight flange. Brighton has machines that can flange material up to 1-1/2” thick.
This semi-automatic welding process is similar to GMAW and utilizes a tubular wire filled with flux that melts during welding to shield the weld pool from the atmosphere.


MIG

This semi-automatic welding process utilizes an arc between a continuous wire electrode and the weld pool. Shielding is supplied by an inert gas, which flows around the wire through a gas cup attached to the torch.

TIG

This process can be either manual or mechanized. An arc is established between the top of a tungsten electrode and the work piece. The base metal and filler metal are melted, but not the tungsten. A shielding gas flows around the tungsten through a gas cup.

A type of heat transfer surface. Brighton can supply half-pipe for heads and shells.

Heating metal heads to suitable temperatures, holding the part at the temperature for a specific length of time and cooling at a rate to obtain desired mechanical properties and microstructure. Heating for the sole purpose of hot forming is excluded from this definition. However, heating to achieve both forming and heat treatment can be simultaneous under some conditions.

Any metal forming operation that is performed above a metal’s recrystallization (process where new grain structures are formed) temperature.

A test to measure the absorbed energy in breaking a test specimen by a single hammer strike as in Charpy Impact testing.
Measurement from the inside center of the head to the tangent line.
Heads that are on the outer shell of a double wall vessel.
Heads that are covered with some type of jacketed material such as half-pipe or dimple jacket.
Also known as corner radius. It is the formed radius of the head which transitions the dish portion to the straight flange. This process is done on the flanging machine.
Certified documents supplied by producing mills that show actual chemical composition and physical properties. Brighton supplies MTRs with shipment.
Characteristics that reveal the reactions, elastic and inelastic, of a material under pressure (force) such as bending, brittleness, hardness, elongation and tensile strength.
The minimum thickness a head can be after forming.
The starting thickness of the blank before forming.
Includes X-Ray, dye check, and ultrasonic testing. Brighton offers all of these services if required.
Heating a ferrous alloy to a suitable temperature above the transformation range and then cooling in air to a temperature substantially below the transformation range.
Measurement from the outside center of the head to the edge of the straight flange. For specific tolerances, please see our tolerance chart.
Also known as U2A report. Document signed by an authorized inspector of the ASME Code. The document confirms that a welded head meets the requirements of the ASME Code. Code plates will also be supplied.
Characteristics pertaining to the physics of a material, such as density, electrical conductivity and coefficient of thermal expansion.

A nitric acid solution process that removes specific surface defects and contaminants such as iron or scale.

In this mechanized or automatic welding process, a small flow of gas is supplied through the nozzle and its constricting orifice to form a plasma arc. Shielding gas flows through an outer nozzle assembly.

This process uses specialized machining to finish stainless steel products to meet customers’ specifications. Brighton offers mechanical finish on plate, shells, and heads from a #3 to a #8.

Please see our polishing chart for more details.

The rapid cooling part of some heat treatments, usually in water after heating to a temperature above the transformation temperature.
Also known as X-Ray. Brighton offers spot and full radiography services.
The straight portion or “can section” of a tank. Brighton can roll shells.

Stick Welding

In this manual welding process, an electrode arc is formed between a consumable electrode and the base material. The electrode is covered by a coating that decomposes and melts during welding. This provides a protective atmosphere around the weld area and forms a slag over the weld pool.

The straight portion of the head measured from the tangent line to the edge of the head. The industry standard is 1-1/2”, but Brighton can form flanges up to 4” depending on size and thickness.
Heating a part to a temperature just below the range at which the grain structure begins to change (usually 1100 – 1200° F) to remove stresses that have built up in the part from various manufacturing methods.

Sub-arc

This mechanized or automatic welding process utilizes a blanket of granular flux to protect the weld pool from the atmosphere. A wire electrode is continuously fed from a spool by a wire-feed system. This provide high deposition rates and high heat input.

The point on the head where the knuckle radius meets the straight flange.
The maximum stress that a material can withstand while being stretched or pulled before failing or breaking.
Standards and methods used in welding. Brighton can supply weld procedures upon request.
The ability of a material to tolerate gradual progressive force without permanent deformation, normally expressed in terms of strain (.2% in the offset method).

Materials

At Brighton Tru-Edge, our team is experienced in working with a wide variety of metals, including carbon steels, stainless steels and specialty alloys. With more than 1,000 weld procedures at our disposal, we can fulfill your project needs.

Contact us to discuss capabilities for any material you don’t see listed here.
  • A572-50
  • SA 203-A
  • SA 203-B
  • SA 203-D
  • SA 203-E
  • SA 240-C
  • SA 285-C
  • SA 36
  • SA 387- 5-1
  • SA 387-5-2
  • SA 387-9-1
  • SA 387-9-2
  • SA 387-11-1
  • SA 387-11-2
  • SA 387-11-22
  • SA 387-12-1
  • SA 387-12-2
  • SA 387-22-1
  • SA 387-22-2
  • SA 414-G
  • SA 515-55
  • SA 515-60
  • SA 515-70
  • SA 516-60
  • SA 516-60N
  • SA 516-60N HIC
  • SA 516-65
  • SA 516-65N
  • SA 516-65N HIC
  • SA 516-70
  • SA 516-70N
  • SA 516-70N HIC
  • SA 537-1
  • SA 537-2
  • SA 553
  • SA 588,CORTEN
  • SA 612
  • AAR TC 128-B
  • SA 240,304
  • SA 240,304H
  • SA 240, 304L
  • SA 240, 304/L
  • SA 240,309S
  • SA 240, 310S
  • SA 240,316
  • SA 240,316H
  • SA 240,316L
  • SA 240,316/L
  • SA 240,317L
  • SA 240, 321
  • SB 536,330
  • SA 240,347
  • SA 240,410S
  • SA 240, 2101
  • SA 240, 2205
  • SA 240, 2304
  • SA 240, 2507
  • SB 127,400
  • SB 162, 200
  • SB 162, 201
  • SB 168, 600
  • SB 168,601
  • SA 240,254SMO
  • SA 240, Ferralium
  • SB 333,B2
  • SB 333, B3
  • SB 409,800
  • SB 409,800H
  • SB 409, 800HT
  • SB 424,825
  • SB 435, X
  • SB 443, 625
  • SB 463, 20
  • SB 575, C4
  • SB 575,C22
  • SB 575,C276
  • SB 575, C2000
  • SB 582, G30
  • SB 625, 904L
  • SB 688,AL6XN
  • SB 688, 25-6HN
  • SB 209,3003-O
  • SB 209, 5083-O
  • SB 209, 6061-O
  • SB 171, Aluminum Bronze
Brass Copper SB 171, 70/30 SB 171, 90/10 SB 96, Silicon Bronze
  • SB 265, Ti Gr 1
  • SB 265, Ti Gr 2
  • SB 265, Ti Gr 3
  • SB 265, Ti Gr 4
  • SB 265, TI Gr 7
  • SB 265, Ti Gr 12
  • SB 551,702
  • SB 551,705
  • Specify Backer Thickness
  • Specify Cladding Thickness